Create a chat app in minutes in Flutter

Recently I started working on a Social Media app and needed to build a Chat UI for it, as I come from React Native background I usually use react-native-gifted-chat which is Chat UI library for React Native and it mostly takes care of everything. As I was unable to find a Chat UI library for Flutter I thought of creating one myself, which I released under the name Dash Chat.
The most complete Chat UI for flutter Inspired by react-native-gifted-chat. Highly customizable and helps developing chat UI faster.
As there are lots of chat tutorial available so I will keep this tutorial short and simple. We will just try to implement Firebase and Dash together. If you are ready to get your timer out because we will build this app in 15 minutes.
1, 2, 3… here we go
The first thing that we need do is create a Flutter Project you can use VsCode plugin for this or Flutter CLI and also setup Firebase. To set up firebase you can follow the guide below:
Ok, great now that you have set up firebase we will add all the dependencies that we need for this tutorial in pubspec.yaml.
dependencies:
  flutter:
    sdk: flutter
  firebase_auth:
  cloud_firestore:
  firebase_storage:
  image_picker:
  shared_preferences:
  uuid:
  dash_chat: 1.0.4
In your main.dart the file you will have this as a starting point:
Laying the Auth screen
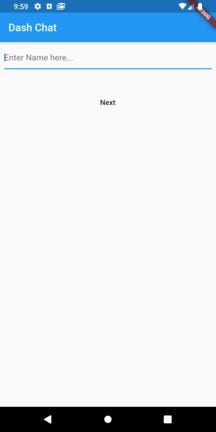
We begin by creating the MyHomePage widget which we will use to get the username and also to authenticate the user on firebase anonymously.
class MyHomePage extends StatefulWidget { _MyHomePageState createState() => _MyHomePageState(); } class _MyHomePageState extends State<MyHomePage> { GlobalKey<FormState> _formKey = GlobalKey<FormState>(); TextEditingController _editingController = TextEditingController(); Widget build(BuildContext context) { return Scaffold( appBar: AppBar( title: Text("Dash Chat"), ), body: Padding( padding: const EdgeInsets.all(8.0), child: Form( key: _formKey, child: Column( children: <Widget>[ TextFormField( controller: _editingController, decoration: InputDecoration(hintText: "Enter Name here..."), validator: (val) { if (val.length < 3) { return "Name to short"; } return null; }, ), SizedBox( height: 40.0, ), FlatButton( child: Text("Next"), onPressed: () async { // Check to see if username was correct if not dont authenticate if (_formKey.currentState.validate()) { try { // Authenticate the user await FirebaseAuth.instance.signInAnonymously(); // If authentication was sucessful move to chat screen. // with username and uuid Navigator.of(context).push( MaterialPageRoute( builder: (context) => ChatScreen( username: _editingController.text, uuid: Uuid().v4().toString(), ), ), ); } catch (e) { print(e); } } }, ) ], ), ), ), ); } }
Laying the Chat screen
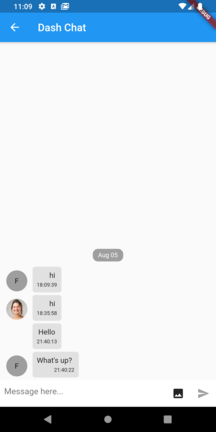
Now that we have authenticated the user and we can start with the actual thing that you are here for, first lets set up the ChatScreen.dart
class ChatScreen extends StatefulWidget { final String username; final String uuid; ChatScreen({this.username, this.uuid}); _ChatScreenState createState() => _ChatScreenState(); } class _ChatScreenState extends State<ChatScreen> { ChatUser user = ChatUser(); void initState() { user.name = widget.username; user.uid = widget.uuid; super.initState(); } Widget build(BuildContext context) { return Scaffold( appBar: AppBar( title: Text("Dash Chat"), ), body: Container(), ); } }
Let’s remove the Container and replace with StreamBuilder so that we can listen to Firestore for changes. In your builder method, we are checking to see if we the stream has any data if not we show a CircularProgressIndicatorand or else show the chat app.
StreamBuilder(
          stream: Firestore.instance.collection('messages').snapshots(),
          builder: (context, snapshot) {
            if (!snapshot.hasData) {
              return Center(
                child: CircularProgressIndicator(
                  valueColor: AlwaysStoppedAnimation<Color>(
                      Theme.of(context).primaryColor),
                ),
              );
            } else {
              return DashChat(
                user: user,
              );
            }
          },
),
We will now start using implementing different features in the dash_chatwidget. This widget has 52 properties that you can override to customize it however you want for this tutorial we will implement only a few of those properties but you can check the GitHub page for detail.
List<DocumentSnapshot> items = snapshot.data.documents;
var messages =
    items.map((i) => ChatMessage.fromJson(i.data)).toList();

return DashChat(
         user: user,
         messages: messages,
       );
we will only override these properties in this tutorial:
-
user (Require)
-
messages (Require)
-
inputDecoration
-
onSend
-
trailing
We have already passed the user object to the DashChat widget now we need to pass a List<ChatMessage> to the DashChat for that, we will first need to convert the retrieved data from Firebase to ChatMessage we can do that above the widget using the ChatMessage.fromJson constructor.
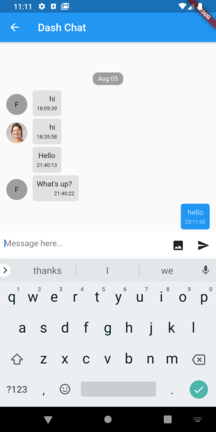
After this, you will have a working chat app but we still have few things missing you cannot add message let do that now, to that you need to add a parameter called onSend which as a parameter gets the ChatMessage object back which we can then send to Firebase, make a note that we are running a transaction because since this is a 1-to-many chat so we might run it a lot of problems:
onSend: (message) {
  var documentReference = Firestore.instance
      .collection('messages')
      .document(
          DateTime.now().millisecondsSinceEpoch.toString());

  Firestore.instance.runTransaction((transaction) async {
    await transaction.set(
      documentReference,
      message.toJson(),
    );
  });
},
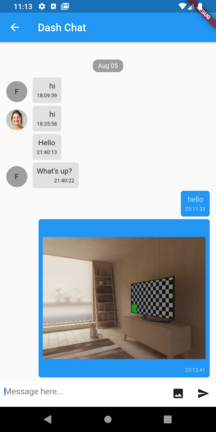
Now that we can successfully send messages we will move to upload images to Firebase Storage for this we will need to add a button in the input bar so that we can open gallery for this we can use to parameters first leading which will add widgets before the input and trailling which will add widgets after for this tutorial we will use trailling.
trailing: <Widget>[
  IconButton(
    icon: Icon(Icons.photo),
    onPressed: uploadFile,
  )
],
Now that we have the icon we can use to call uploadFile method which will upload the file to Firebase to get the file from the gallery we will use image_picker package if you want to get the image from camera you change the source to ImageSource.camera.
void uploadFile() async {
  File result = await ImagePicker.pickImage(
    source: ImageSource.gallery,
    imageQuality: 80,
    maxHeight: 400,
    maxWidth: 400,
  );

  if (result != null) {
    String id = Uuid().v4().toString();

    final StorageReference storageRef =
        FirebaseStorage.instance.ref().child("chat_images/$id.jpg");

    StorageUploadTask uploadTask = storageRef.putFile(
      result,
      StorageMetadata(
        contentType: 'image/jpg',
      ),
    );
    StorageTaskSnapshot download = await uploadTask.onComplete;

    String url = await download.ref.getDownloadURL();

    ChatMessage message = ChatMessage(text: "", user: user, image: url);

    var documentReference = Firestore.instance
        .collection('messages')
        .document(DateTime.now().millisecondsSinceEpoch.toString());

    Firestore.instance.runTransaction((transaction) async {
      await transaction.set(
        documentReference,
        message.toJson(),
      );
    });
  }
}
Yay!!! Now you have a fully functional chat app which you can customize completely, we haven’t fully explored all the parameters in this tutorial but if like for me cover let me know in the comments in the meantime you can take a look at the docs in the link mentioned above.
Here’s the link to the Github repository:
A new Flutter project. This project is a starting point for a Flutter application.
Thank you for reading.